How To Build
A Raised Bed Planter
If your yields are disappointing, your garden space isn’t as productive as you’d like, or if you only have a small space to devote to gardening, building a raised bed may be the answer to all of your problems. Here's how to do it.
Quick Methods
1. Use an old wooden boat. Using a wooden boat can be a great way to make your garden look unique but it can also help if you possess few building or carpentry skills. Search online listings like Craigslist or inquire around at local tackle or sailing shops to find an appropriate boat.
Find an old wooden row boat (or similar). One which is no longer fit for use in the water will probably be cheapest.
Paint it whatever color you would prefer and drill a few holes in the bottom.
Place it in its final location, so that the boat is level. A trench may be necessary.
Line the bottom with gardening plastic, and place a number of rocks or other fill material to even out the bottom a bit.
Fill with dirt and plant whatever you desire.
2. Use an old wooden bed frame. You can purchase antique bed frames to make your gardening bed look quirky and unique. The downside, of course, is that it may end up at an awkward height for planting and it will be difficult to reach the center if using a very large led. A child’s twin bed is recommended.
If you can only find a head- and foot-board, these can be attached to an appropriately sized bed as described below.
If the frame of the bed is intact with sideboards, you can simply add more sideboards to create a box within the bed. Measure for the boards and nail them (from the inside of the bed) to the posts. Fill with dirt and plant.
3. Use old wine crates. Wine crates, orange crates, or any similar crate can be turned into an excellent planting box. Simply drill holes for drainage if there are none, fill with dirt, and plant. Place them on your gardening beds or on a flat or angled table to display.
Planning the Project
1. Visualize and then design the shape of your raised bed. Luckily, a raised bed doesn’t take much! You basically build an open-topped and open-bottomed box, and you can do it in any shape that you want. Think of yourself as building a form to pour soil into (like one might pour cement or plaster into a form).
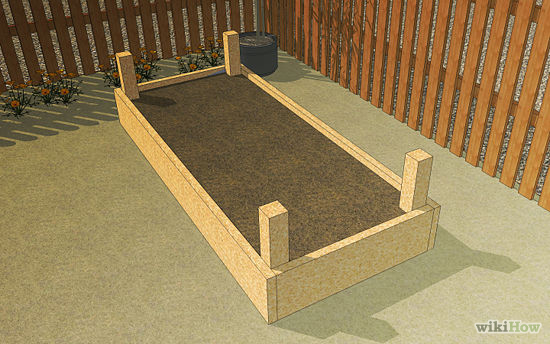
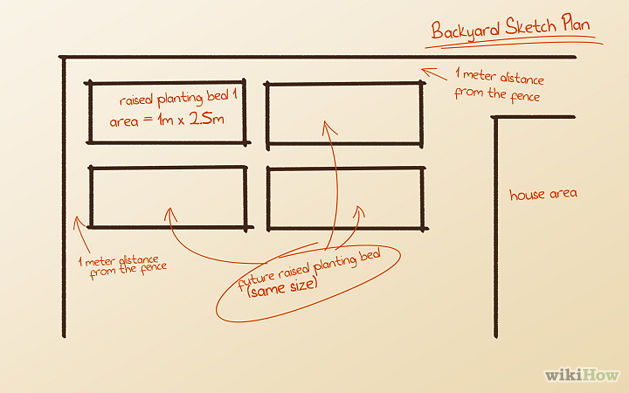
2. Draw your planned bed, measure your available garden space, and
add the measurements onto your drawing. Now you’ll be able to determine
how much material you’ll need to build the bed.
3.
Decide which materials to use. You can use just about anything that will
hold dirt. Lumber, plastic, synthetic wood, bricks,
rocks, or a number of other items are possible materials. However, using
lumber is generally the easiest and most efficient method. This article
will focus on making a raised bed out of lumber or synthetic lumber.
4.
Gather your supplies. A full list of supplies is below under Things
You'll Need. All that you really require are sides cut to your desired
length and at least 24" (60 cm) in height. If you want a triangular
raised bed, you will need three sides. If you want a square bed, you
will need four sides of equal length. For a rectangular, bed you need
four sides, with two of one length and two of another. You get the idea!
Building the Raised Bed
1.
Place posts. Use 4x4s cut to twice the height of the intended raised
bed. Dig holes and place the bottom half of the 4x4 into the ground,
anchoring the post. Cover and ensure that the posts are level and in the
correct place.
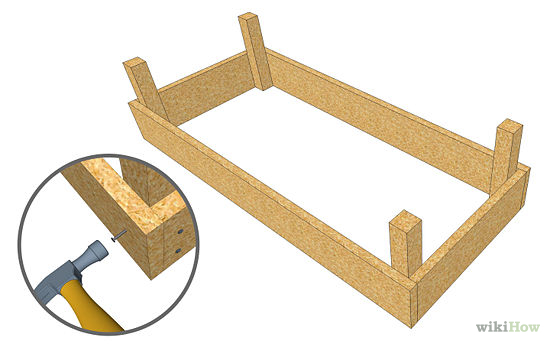
2. Attach long-side boards. Cut your intended
siding to the length of the long side between posts, including the width
of the post itself. Use nails or screws of an appropriate length and
drive two at the end of each board into the posts. Place boards until
the sides are the intended height of the bed. Cut boards to be narrower
for the last piece, if necessary.
3. Attach short-side
boards. Measure and cut the short-side boards to the distance between
the outer edge of the two long-side boards. Again, use two nails at the
ends of each board, driven into the posts.
4. Create a
lip, if desired. You can create a more attractive raised bed by adding a
lip to the upper edge. First, cut and miter a picture-frame style lip
from boards of the desired width for the lip. Acquire lumber posts which
are half the width of the lip and use appropriate nails to attach these
to the outer side, at the top of the bed. Fit the mitered lip together
and nail those pieces at the inside corners from the top, down into the
post and the brace beam underneath.
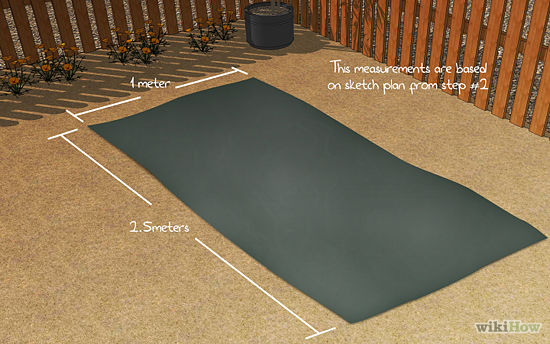
5. Cut a piece of
gardening plastic or weed mat to fit the footprint of your raised bed.
By putting a barrier down, you will significantly reduce the weeds that
will grow in your bed. Seven or eight layers of dampened newspaper will
also keep the weeds from growing, as well as cardboard from appliance
boxes.
Using the Raised Plant Bed
1.
Once your bed is in its permanent position, fill it with soil. Add some
composted manure into the bottom of the bed and then layer potting soil
on top of the nutrient-rich compost. You can cut costs significantly by
using some soil (up to 50%) from other parts of your property. Plan on
filling at least 1/3 of your raised bed with compost or composted manure
(available from nurseries or garden centers in 40-pound bags).
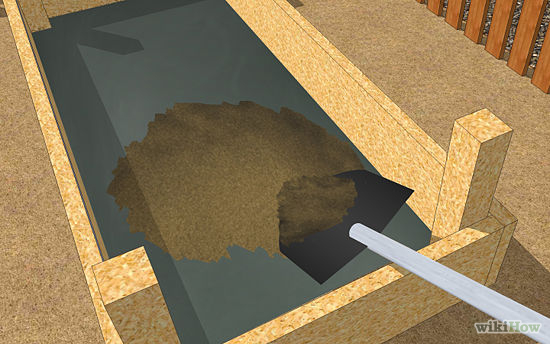
Mix in dry organic fertilizers (like wood ash, bone meal, and blood meal) while building your bed. Follow package instructions.
2.
Start planting. Some people like to grow flowers in their raised beds.
Some prefer to grow vegetables. The options are nearly limitless. If you
do want to grow food, raised beds are excellent choices for salad
greens, carrots, onions, radishes, beets, and other root crops.
3.
Protect your raised bed from the elements. To build a miniature
organic insect control spring/summer/fall "greenhouse", add hoops to
your raised bed by bending and connecting PVC pipe in an arch over the
bed. Put an arch every 4-6 feet (1.2 meters - 1.8 meters).
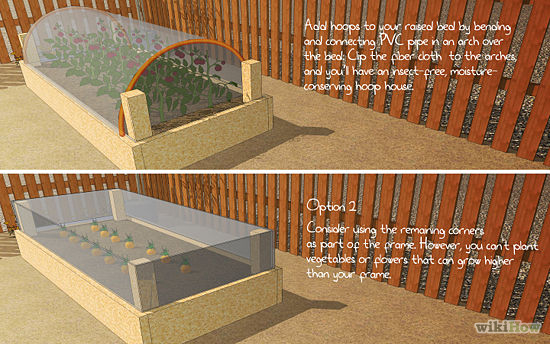
Buy a piece of floating row-cover, also called spun fiber cloth from a
garden supply store or online, clip it to the arches, and you’ll have an
insect-free, moisture-conserving, hoop house that you can use to grow
food in throughout the growing season.
When the plants in one
section become so tall that the cover is no longer practical, you can
uncover that portion, and take the cover all the way to the ground
between portions still using the cover. It may seem strange but light,
warmth and moisture can all penetrate the cover in sufficient
proportions in full sun, but bugs and wind-borne weed seeds cannot.
Therefore this step can help you reduce your watering, weeding, and
pesticide demands.
You can also use the frame to support
plastic bird netting to limit, if not eliminate, deer damage to your
hard won efforts.
Tips
Raised bed gardens
should ideally be 2 to 4 feet (60 cm x 1.2 meters) wide. Two (2) feet (
60 cm) if the gardener only has access to the raised bed from one side,
and four (4) feet (1.2 meters) if the gardener can access the raised bed
from both sides. It should not be made wider, as the gardener would
then need to step into the raised garden (thereby compacting the soil)
or might add strain to his or her back.
You can reduce your soil
costs to virtually nil by layering grass clippings and straw (not hay,
because it contains seeds) or fall leaves. Water each layer thoroughly
and tramp it down before adding the next layer. When the bed is full,
you can plant into it by putting potting soil in each hole that you dig.
By the time the plant roots start reaching beyond the hole, the compost
material will have started to decompose. If you plan to plant seeds,
then add a thin top layer of potting soil or compost. Be prepared to add
additional compost material each season because compost material
reduces in volume as it decomposes.
Raised beds are easier to
reach than rows planted in the ground. If you have trouble leaning down,
you can build a raised bed taller, even up to waist height. Just be
sure to build strongly enough and water accordingly.
Keeping raised beds narrow will help with the conservation of water.
Make sure to water your raised bed often. Because it is above ground,
your raised bed will not retain water as well as the soil in the ground.
It will also help to place your raised bed near a water source—this
will make it easy to water all year.
Building a raised bed with two people is much easier and faster than with one.
Decorate your raised bed, or even illuminate it, to make it a centerpiece in your yard.
Be creative when building your raised planting bed. You can construct a
great raised bed out of junk lumber, so don’t be afraid to experiment.
Raised beds are quite useful and extremely affordable.
Consider
using 2" x 12" (5 cm x 30.5 cm) pieces of lumber cut to length. If you
lay these on their sides and put one on top of another on each side of
the bed, your bed’s depth will be roughly 24" (60 cm).
You can
either buy potting soil at a garden supply store, dig it up from
surrounding areas, or buy it by the truckload from a larger outlet. Do
some pricing and decide what is best for you. Store bought potting soil
is sterilized and will have no weed seeds, but it can get expensive to
purchase in large quantities. If you dig soil from your yard or land
there will likely be more weed seeds, but the price will be right.
Warnings
Raised beds are an attractive toilet to cats. If you have any rowdy
cats in your neighborhood, consider growing enough catnip to keep them
sufficiently sedated.
In some areas, having lumber in contact
with the ground increases the risk of termite infestation for nearby
wood structures such as homes.
Some older pressure-treated lumber
-- the green-tinted lumber that is often used for outdoor structures --
may contain arsenic which is a deadly poison as well as a carcinogen.
Arsenic is no longer used to treat lumber, however older lumber may
still contain this poison. Arsenic is released when the wood is sawed or
burned, and can be leached out of the wood when the soil is acidic, or
in the presence of acid rain. Although it is tempting to use this type
of lumber for your raised beds because it lasts years longer, you may
want to stick with ordinary lumber, especially for your vegetable beds,
and plan on replacing it every three to five years.
New treated lumber no longer contains arsenic. Recycled lumber, however, may contain this chemical.
Things You'll Need
Forms for your raised bed (Consider using 4" x 4" (10cm x 10cm) posts
cut to 24" (60 cm) in height for corners and 2" x 12"(5 cm x 30.5 cm)
pieces for the sides)
Nails or screws
Hammer or screwdriver
Compost
Soil
Seeds or plant starts
Shovel
Rake
Barrier (plastic liner or similar) to keep weeds out. Vapor barrier can
also be used to line the inside of the sides of the bed. This will
greatly extend the life of the wood.
PVC piping and greenhouse plastic (optional)
Composted manure (available at nurseries or from farms)
Sources and Citations
http://eartheasy.com/grow_raised_beds.htm
http://www.mastergardenproducts.com/gardenerscorner/raised_bed_gardening.htm
http://www.coopext.colostate.edu/4DMG/VegFruit/rowcover.htm
http://king.wsu.edu/Gardening/documents/19RowCoversforVegetableGardens.pdf